
Did you know that over 40 percent of travelers experience mobile connectivity issues abroad? Staying connected can make or break your trip, whether you rely on maps, booking apps, or just want to check in with loved ones. A smooth switch to a travel SIM or eSIM keeps you online and protects your data, so you can focus on exploring new places without stress.
Quick Summary
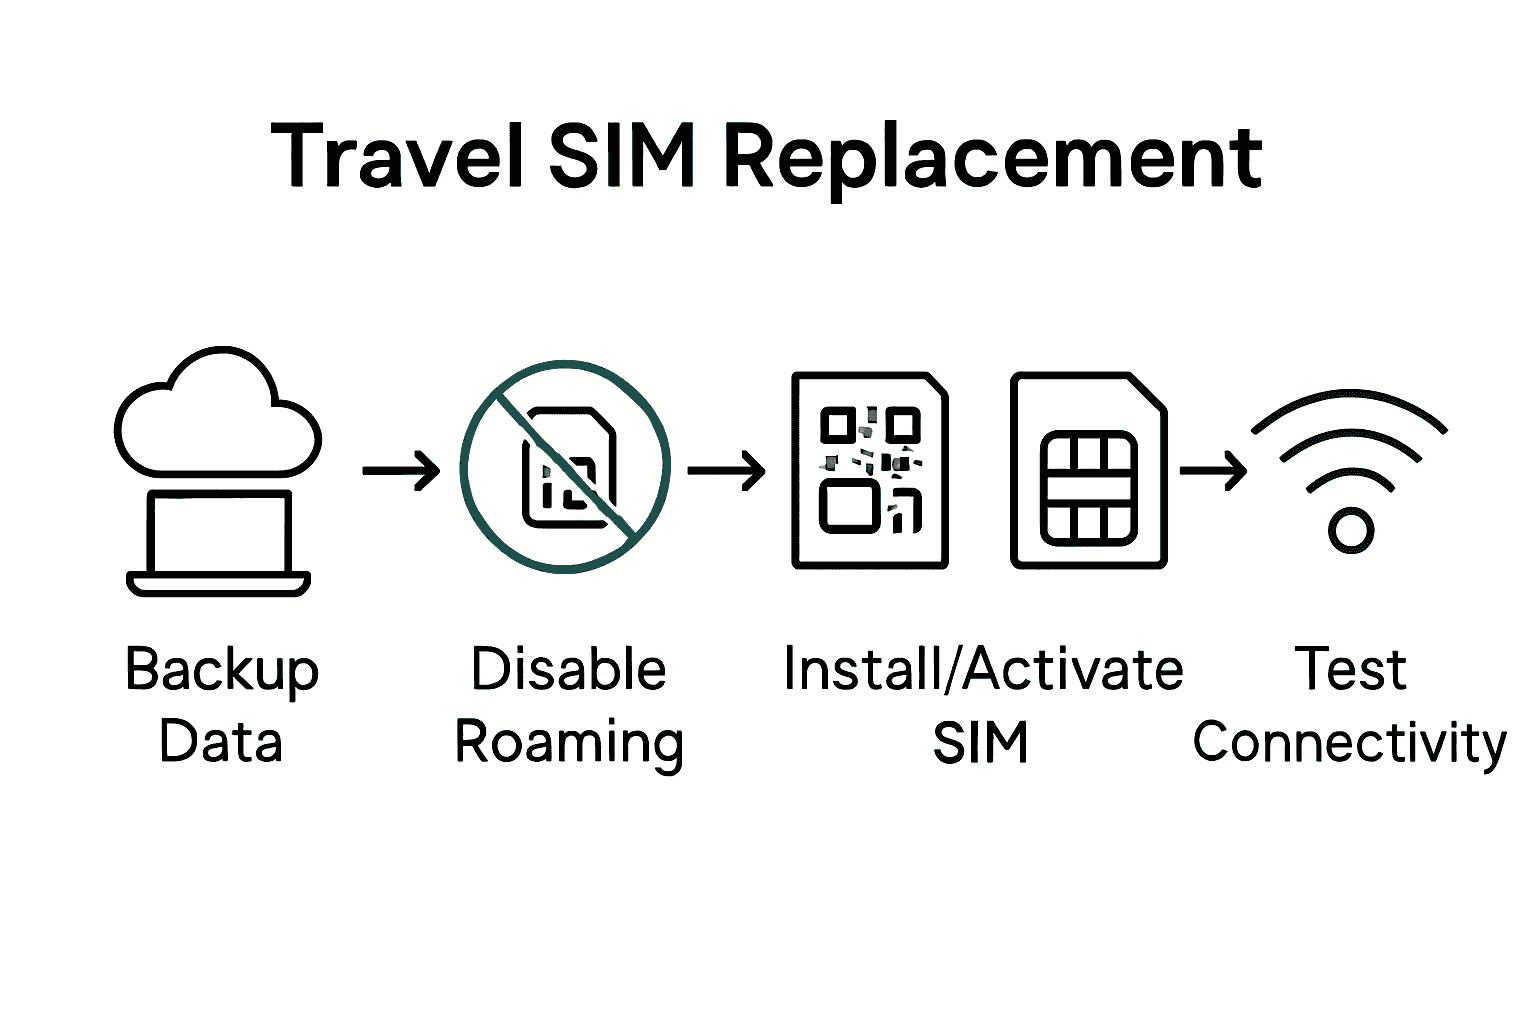
| Key Point | Explanation |
|---|---|
| 1. Back up your smartphone data | Create a comprehensive backup using cloud storage or a computer to safeguard important information before traveling. |
| 2. Disable data roaming on primary SIM | Maintain access to your original number and SMS while preparing for your travel eSIM or SIM. |
| 3. Install the eSIM before traveling | Activate your eSIM by scanning the provided QR code shortly before departure for an easy setup. |
| 4. Configure device network settings | Set your travel eSIM as the default data line and disable automatic data switching for optimal connectivity. |
| 5. Test connectivity before departure | Validate that your travel eSIM is functioning by checking settings, running speed tests, and confirming active status. |
Step 1: Gather required tools and backup important data
Before you jet off on your international adventure, you’ll want to prepare your mobile connectivity toolkit and safeguard your precious digital information. This step ensures you stay connected smoothly and protect your important data during travel.
First, grab the essential tools you’ll need: your current smartphone, the travel SIM card or eSIM you’ve purchased, and a computer or cloud storage service for backing up your data. According to International SIM Card, it’s recommended to install your eSIM before travel to avoid potential connectivity delays and give yourself peace of mind.
Start by creating a comprehensive backup of your smartphone. Connect your phone to your computer or use cloud services like iCloud or Google Drive to save:
- Contacts
- Photos
- Important documents
- Text message history
- App data
When backing up, choose a service that automatically syncs or manually transfer files to ensure nothing gets left behind. Pro tip: Use both cloud storage and a physical backup like an external hard drive for maximum security.
Next, check your current mobile plan settings. According to GetNomad, it’s smart to disable data roaming on your primary SIM instead of removing it completely. This preserves access to your original number and maintains important backup connections while safely using your travel eSIM.

Quickly verify that your smartphone is unlocked and compatible with international networks. This small check can save you significant hassle once you arrive at your destination. With your data safely backed up and your tools gathered, you’re ready to move on to the next step of your travel SIM card replacement process.
Step 2: Remove existing SIM or eSIM profile safely
Now that you have your backup ready, it is time to safely manage your existing mobile connectivity. This step involves carefully handling your current SIM or eSIM profile to ensure a smooth transition to your travel connectivity solution.
For physical SIM cards, resist the temptation to immediately yank out your primary SIM. According to GetNomad, it is smarter to disable data roaming through your phone settings. This approach lets you retain access to SMS and calls while preparing for your international journey. Go to your smartphone settings, locate the mobile data or cellular settings, and turn off data roaming to prevent unexpected charges.
If you are working with an eSIM, proceed with even more caution. eSIM Tours highlights a critical point many travelers overlook: eSIMs often cannot be reinstalled once removed. Your best strategy is to disable the eSIM rather than deleting it entirely. This preserves your profile and prevents the need to repurchase a new eSIM.
For iPhone users, navigate to Settings > Cellular > Cellular Plans and select the option to turn off the eSIM. Android users will find similar options in Settings > Network and Internet > Mobile Network.
Pro Tip: Always screenshot or save your eSIM QR code before making any changes. This provides a backup if you need to reinstall.
Check your device thoroughly. Confirm that your primary number remains accessible and that your new travel eSIM or SIM is ready to activate. For those interested in understanding more about the nuances between eSIMs and physical SIMs, read our comprehensive guide on eSIM vs Physical SIM.
With your existing mobile profile carefully managed, you are now prepared to move forward with installing your travel connectivity solution.
Here’s a summary of steps for safely managing your SIM or eSIM:
| Action | Physical SIM | eSIM Profile |
|---|---|---|
| Removal recommended | No, disable data roaming | No, disable eSIM, do not delete |
| Data retention | Retains number & SMS access | Profile preserved if disabled |
| Key precautions | Avoid immediate removal | Screenshot QR code/back up info |
| Device steps | Settings > Mobile Data > Roaming off | Settings > Manage eSIM > Turn off |
Step 3: Install new travel SIM card or activate eSIM
With your existing mobile profile managed, you are now ready to set up your travel connectivity solution. This crucial step will ensure you have seamless internet access during your international adventure.
For eSIM installation, the process is remarkably straightforward. According to Mobile SIM Blog, most eSIMs are designed to activate automatically when connecting to a supported network at your destination. This means you can complete the installation before your trip and have everything ready to go.
Begin by locating the QR code provided with your travel eSIM. As Your eSIM recommends, install the eSIM shortly before your departure. For iPhone users, go to Settings > Cellular > Add Cellular Plan and scan the QR code. Android users will find similar options in Settings > Network and Internet > Mobile Network > Add carrier.
If QR code scanning does not work, most providers offer manual entry options. You will typically need to input a series of numbers or a unique activation code. Keep your purchase confirmation or instructions handy during this process.
Pro Tip: Screenshot your eSIM details and activation information as a backup in case you encounter any technical issues.
For travelers wondering about device compatibility, check out our guide on eSIM-compatible phones to ensure your device is ready for international connectivity.
Remember that actual activation occurs at your destination. Enable data roaming in your settings and select the new eSIM line when you arrive. Your phone will automatically connect to supported local networks, giving you instant internet access.
With your new travel connectivity solution installed, you are just one step away from being fully prepared for your international journey.
Step 4: Configure device settings for network access
You are now approaching the final stage of preparing your mobile device for international travel. This step focuses on configuring your device settings to ensure smooth and reliable network access during your journey.
For iPhone users, the configuration process requires careful attention to detail. According to Trip.com’s guide, you will need to navigate through several settings to optimize your travel eSIM experience. First, go to Settings > Cellular > Cellular Plans and choose your new travel eSIM as the default data line. Critically, disable the ‘Allow Cellular Data Switching’ option to prevent your phone from automatically jumping between SIM cards.
Next, enable the ‘Turn On This Line’ toggle for your travel eSIM and activate data roaming. This ensures your device will connect to local networks at your destination. If multiple network options appear, carefully select the most appropriate carrier for your specific travel region.
Android users will follow a similar process. Your eSIM recommends going to Settings > Network and Internet > Mobile Network. Here, choose your travel eSIM line and enable mobile data and data roaming. The key recommendation is to disable auto data switching, which prevents your device from defaulting back to your home SIM.
Pro Tip: Always do a test connection before leaving your home country to ensure everything is configured correctly.
If you are uncertain about your specific device’s capabilities, check out our comprehensive guide on eSIM-compatible phones to verify your setup.
With your device settings now properly configured, you are ready for seamless international connectivity. The next step is to confirm your network access and prepare for your exciting travel adventure.
Step 5: Test connectivity and confirm successful replacement
You have meticulously prepared your device for international travel, and now it is time to validate your hard work. This final step ensures your travel connectivity solution is functioning perfectly before you embark on your journey.
According to Mobile SIM Blog, the key to confirming your eSIM’s functionality is systematically validating your network settings. Start by enabling mobile data and roaming on your travel eSIM line. Open your phone’s cellular settings and verify that the new eSIM appears in the available networks list.
Up eSIM recommends conducting a comprehensive connectivity test before leaving home. If possible, find a local WiFi connection and temporarily switch your primary data line to the new travel eSIM. Run a speed test, send a message, or make a brief call to confirm everything works smoothly.
For iPhone users, navigate to Settings > Cellular > Cellular Plans and confirm your travel eSIM shows an active status. Android users should check Settings > Network and Internet > Mobile Network to verify the eSIM line is ready.
Pro Tip: Download an offline map or translation app while on WiFi to ensure you have critical resources even during initial network setup.
If you encounter any issues or want additional reassurance about your device’s international readiness, explore our guide on eSIM-compatible phones.
With your connectivity confirmed, you are now fully prepared to enjoy seamless mobile access throughout your international adventure.
 Your carefully configured travel SIM or eSIM is ready to keep you connected no matter where your journey takes you.
Ready for Seamless Travel SIM Replacement? Discover the SimCorner Difference
Is your head spinning after managing backups, eSIM profiles, and device settings just to stay connected while travelling? You are not alone. Many travellers find themselves anxious about losing important data, struggling to identify the right international SIM or eSIM, and worrying about costly roaming charges. Missing one small step can disrupt your entire trip. That is where SimCorner steps in with hassle-free solutions built for Australian adventurers.
Why risk your holiday connectivity when you can travel with confidence?
Take the stress out of switching SIM cards or activating eSIMs. Shop directly at SimCorner for travel-ready SIM cards and easy eSIM options that are supported by clear guides and rapid support. Curious about device compatibility? Get answers in our expert resource eSIM-Compatible Phones and take advantage of our eSIM vs Physical SIM comparison. Visit SimCorner today to secure your travel SIM and feel the difference of smooth, reliable connectivity. Make your next trip easy by preparing with the trusted specialists in travel communication.
Frequently Asked Questions
What tools do I need for the travel SIM card replacement process?
You will need your current smartphone, the travel SIM card or eSIM purchased, and a computer or cloud storage service for backing up your data. Gather these items before you begin the replacement process to ensure a smooth experience.
How do I back up my smartphone before replacing my SIM card?
To back up your smartphone, connect it to a computer or use cloud services like iCloud or Google Drive. Make sure to save all important data such as contacts, photos, and important documents to avoid losing them during the SIM card replacement.
What should I do if I have an eSIM during the replacement process?
If you’re using an eSIM, first disable, but do not delete, the existing eSIM profile to preserve it. Navigate to your device’s settings to turn it off, ensuring you keep access to your profile for potential future use.
How do I install my new travel SIM card or activate my eSIM?
To install your new travel SIM card or activate your eSIM, scan the QR code provided with your new plan. Follow the steps in your device’s settings to add the new line and ensure activation after arriving at your destination.
How do I configure device settings for my new travel connectivity?
You will need to select your new travel SIM or eSIM as the default line and enable mobile data and roaming. Go to your device’s settings for network options, and turn off auto data switching to ensure you stay connected to your new plan.
What steps should I take to test my connectivity after replacing the SIM card?
To test your connectivity, enable mobile data and roaming on your new travel SIM or eSIM. Conduct a speed test or make a call while connected to a local WiFi network to confirm that everything is working correctly before your international trip.


