
Making an international call from Australia might seem a bit tricky at first, but it boils down to a simple, repeatable formula. Once you get the hang of it, you'll be connecting with friends, family, and colleagues across the globe in no time.
It's all about dialling a four-part sequence: start with the Australian exit code (0011), then punch in the country code for your destination, followed by the area code (just remember to drop the first zero if there is one), and finally, the local phone number. That’s it. Mastering this little sequence is your ticket to hassle-free global calls.
The Complete International Dialing Sequence
Before your call can even think about connecting, you've got to give it the right instructions. Think of the numbers you dial as a specific address that routes your call from your mobile here in Australia all the way to a phone on the other side of the world. Each part of the number plays a vital role.
Getting The Core Components Right
The whole process is surprisingly logical. The first number you dial—the exit code—is basically you telling your phone network, "Hey, this call is going overseas." From there, the country code points the call to the right nation, and the area code narrows it down to the correct city or region.
The Australian Communications and Media Authority (ACMA) sets the rules for this, and the official exit code you need to use from Australia is '0011'. After that, it's just a matter of the destination's country code and the local number. For example, if you were trying to reach a landline in Birmingham, UK, your phone screen would show something like: 0011 44 121 xxxx xxxx. For anyone wanting to dig deeper, the ACMA has plenty of info on their official international calling protocols.
This visual gives you a quick snapshot of how those pieces fit together.
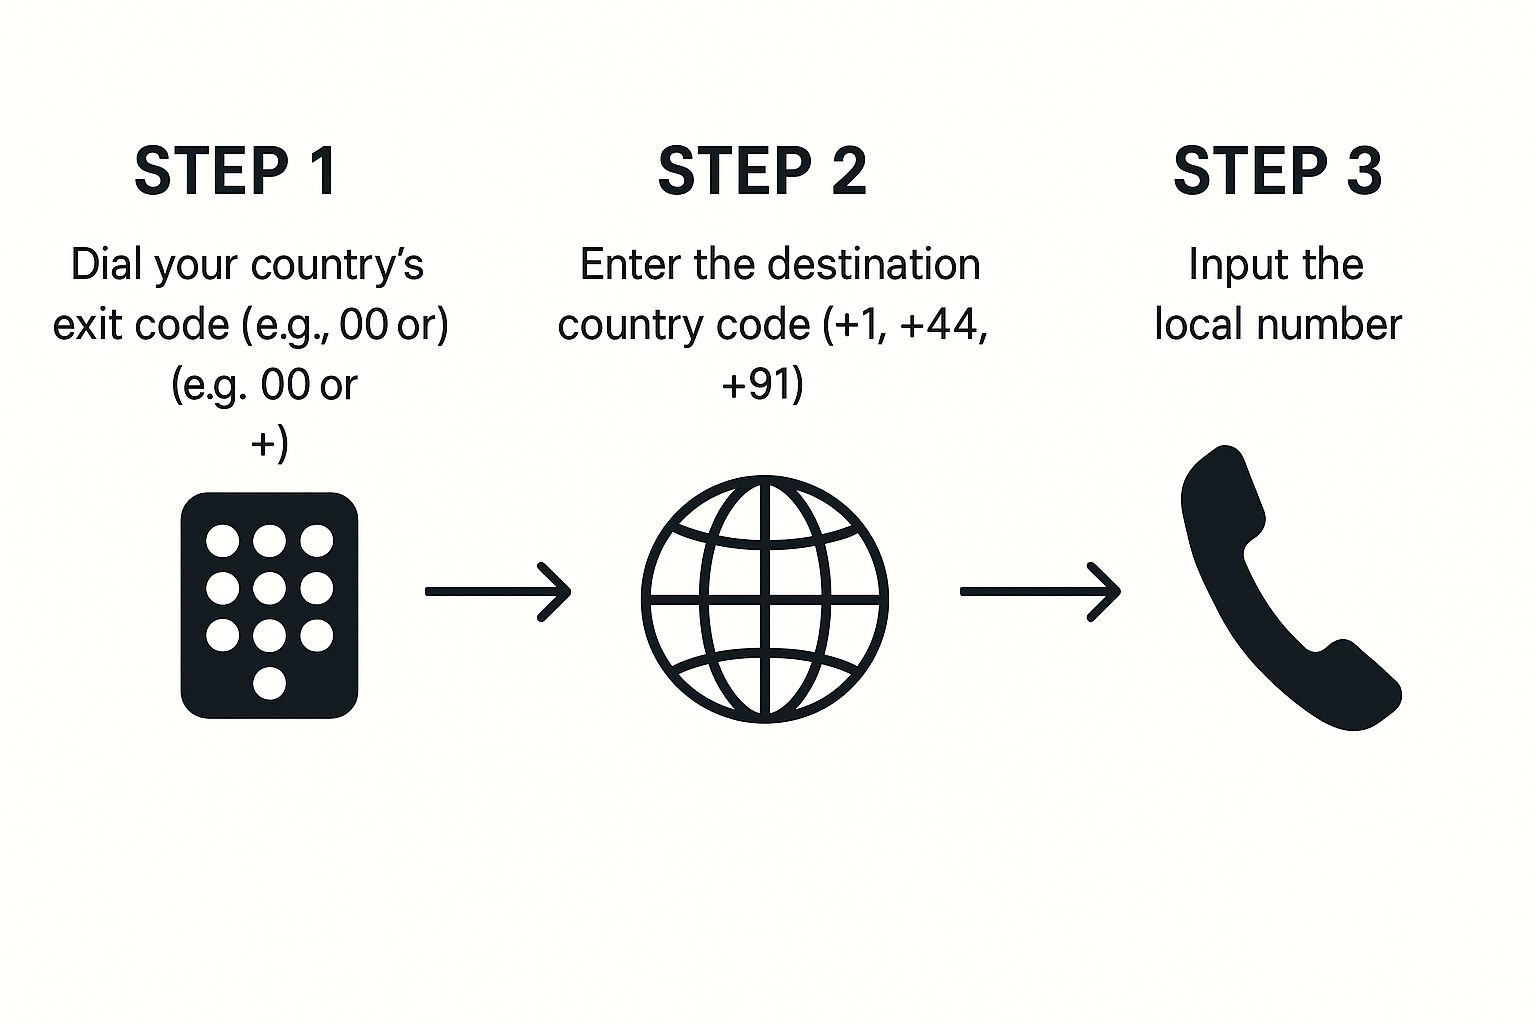
As you can see, it’s really just three distinct blocks of numbers, each with a specific job to do to get your call where it needs to go.
A Quick Reference Guide
To make it even clearer, here’s a simple table breaking down the sequence using a real-world example.
International Dialing Sequence Breakdown From Australia
| Component | What It Is | Example (Calling the UK) |
|---|---|---|
| Exit Code | The code telling your network you're calling internationally. | 0011 |
| Country Code | The unique number for the country you're trying to reach. | 44 (United Kingdom) |
| Area/City Code | The code for the specific region or city (without the leading '0'). | 20 (for a London number listed as 020) |
| Local Number | The final, unique number of the person or business you're calling. | xxxx xxxx |
This table is a great little cheat sheet to keep handy until dialling internationally becomes second nature.
Practical Dialing Examples
Knowing the formula is one thing, but seeing it in action really makes it click. Let's run through a couple of common scenarios.
-
Calling a Mobile in the USA: Say you’re trying to reach a mobile in New York with the area code 917. You would dial: 0011 (Aus exit code) + 1 (USA country code) + 917 (area code) + xxx-xxxx (the person's number).
-
Calling a Landline in New Zealand: To ring a landline in Auckland, which has the area code 9, the sequence would be: 0011 (Aus exit code) + 64 (NZ country code) + 9 (Auckland area code, dropping the '0') + xxx-xxxx (the local number).
A common trip-up is forgetting to drop the leading zero from the area code. It’s an easy mistake to make. For instance, a London number that’s written locally as 020 becomes just 20 when you dial it from Australia. That tiny detail is often the culprit when a call refuses to connect.
Choosing the Right International Calling Method

Long gone are the days of fumbling with calling cards or crossing your fingers and hoping the landline connection holds. Today, you've got a world of international calling options at your fingertips, each with its own perks. The real trick is matching the method to what you actually need.
Are you a business traveller who needs flawless call quality for meetings? Or a backpacker just wanting to check in with family every so often? Your needs will dictate the best choice.
It’s tempting to just use your everyday mobile provider. While it’s certainly the easiest option, it can also be the fastest way to get a nasty case of bill shock. Those per-minute rates add up alarmingly quickly, which is why it pays to look at modern alternatives.
Comparing Traditional and Modern Solutions
Your decision really boils down to a few key things: how much you want to spend, how convenient you need it to be, and how important call quality is for you.
Let's break down the main contenders on the scene today.
-
Traditional Mobile Carriers: This is the default for most people. You just use your existing SIM and dial. Simple, right? But it’s often wildly expensive unless you buy a specific international calling pack, which might lock you into a contract you don't need.
-
International SIM Cards: A traveller's best friend. You get a physical SIM card for the country or region you're visiting, giving you a local number and much, much cheaper rates for calls, texts, and data. If you want to dive deeper, we've got a detailed guide on how to choose the best international travel SIM card.
-
eSIMs (Embedded SIMs): This is the digital evolution of the travel SIM. An eSIM is downloaded and activated on your phone, so there's no physical card to swap. It's incredibly handy for frequent flyers or anyone with a newer smartphone that supports them.
-
VoIP (Voice over Internet Protocol) Services: These clever services use your internet connection to make calls. Think apps like Skype, or dedicated services that let you call landlines and mobiles for a fraction of the usual cost.
For most Aussies, the savings between these methods can be huge. For instance, some VoIP and web-based services now offer pay-as-you-go international calls for as little as AUD 0.05 per minute to places like the U.S. That’s a massive saving when you compare it to standard carrier rates, which can easily be over AUD 1.00 per minute.
Finding the Best Fit for You
So, which path should you take? It all comes back to your own travel style and needs.
Think about a business professional in Sydney who has to jump on crystal-clear conference calls with a client in London. For them, a reliable VoIP service or a premium eSIM plan that guarantees top-notch voice quality is non-negotiable. Here, reliability is worth every cent.
Now, picture a student backpacking their way through Southeast Asia. Their main concern is keeping costs down while staying flexible. They might use free Wi-Fi calling in their hostel and rely on a data-heavy eSIM for Google Maps and the occasional WhatsApp call while they're out exploring. Their setup is all about balancing cost with basic connectivity.
Ultimately, the best first step is to take a good look at your own calling habits, how often you travel, and what your budget is. By weighing the pros and cons of each method against your personal situation, you'll find the perfect way to stay connected across the globe without coming home to a shocking phone bill.
A Practical Guide to Using eSIMs for Travel
For any seasoned traveller, eSIMs are a genuine game-changer, completely overhauling how we stay connected overseas. You can forget about fumbling with those tiny plastic SIM cards and the little pin tool. An eSIM is a digital SIM you download straight onto your phone, giving you a much simpler way to manage your mobile plan for international calls or just browsing online.
This digital-first approach means you can sort out your entire international plan before you've even packed your bags. Just imagine landing in a new country and your phone automatically connects to a local network. No more hunting down a telco shop at the airport.
Finding and Buying Your Ideal eSIM Plan
First things first, you need to pick a plan that actually fits your trip. Providers offer all sorts of packages, some for specific countries and others covering entire regions. Your choice really boils down to where you're going and what you'll be using your phone for.
Before you jump in, think about these key things:
- Destination Coverage: Are you just hitting up the USA, or are you planning a multi-country trek through Europe? Make sure you find a plan that covers every single stop to avoid the hassle of juggling multiple eSIMs.
- Data Allowance: Be honest about how much data you’ll need. If you're mostly going to be on hotel Wi-Fi, a smaller data pack will probably do the trick. But if you’re relying on your phone for Google Maps, ride-sharing apps, and a bit of streaming, you’ll want a bigger allowance.
- Call and Text Inclusions: Heaps of travel eSIMs are data-only, which is perfect if you’re happy using apps like WhatsApp or FaceTime to call home. If you need a proper local phone number for making traditional calls and texts, double-check the plan explicitly includes it.
By weighing these up, you can lock in a plan that perfectly matches your itinerary and budget, ensuring you only pay for what you’ll actually use. If you're new to the whole idea, getting your head around what an eSIM is and how it works is a great starting point before you buy.
Activating Your eSIM for Seamless Travel
Once you've bought your plan, getting it activated is surprisingly straightforward. In most cases, the provider will email you a QR code almost instantly.
Here's how it usually goes down:
- Make sure you have a solid internet connection (it's best to do this before you leave Australia).
- Head into your phone’s mobile settings and find the option to "Add eSIM" or "Add Cellular Plan."
- Your phone’s camera will pop up—just scan the QR code from your email.
- Follow the prompts on screen to give your new eSIM a label (like "Europe Trip") and finish the setup.
The whole thing takes a couple of minutes, and you'll be all set for instant connectivity the moment your plane touches down.
Pro Tip: Keep your Aussie SIM active in your phone's settings but switch your new eSIM to be the primary line for mobile data. This setup, often called Dual SIM, is brilliant. It lets you keep receiving important texts to your Australian number (like bank verification codes) while you use the cheap eSIM data for everything else.
Managing Your Connectivity on the Go
One of the best things about an eSIM is the control it gives you. You can flick between your Australian SIM and your travel eSIM right from your phone’s settings. This is perfect for keeping costs down and making sure you’re always using the best option for data or calls.
For instance, if you need to call a landline back in Australia, you can quickly switch your primary voice line back to your home SIM. Then, for browsing, navigating, and making app-based calls, you'll want to keep your travel eSIM active for data. It's this kind of flexibility that makes eSIMs such a powerful tool for any traveller looking to master making international calls without breaking the bank.
How to Get Crystal-Clear Call Quality
There's nothing more frustrating than an international call that's choppy, delayed, or keeps dropping out. A cheap call is pointless if you can't actually understand the person on the other end.
The good news is that crystal-clear quality is definitely achievable. It usually comes down to one key factor: your internet connection.
Whether you're using a VoIP app or an eSIM with Wi-Fi calling enabled, the stability of your internet is the absolute foundation of your call. Before you dial, it’s always a good idea to get a quick read on your connection speed. You don’t need a ridiculously fast connection, but a stable one is non-negotiable.
Optimise Your Connection Before Dialing
A weak or overloaded connection is the number one culprit behind most call quality issues like echoes, lag, and dropped calls. Think of it like trying to have a conversation next to a loud construction site—the background noise just gets in the way of a clear chat.
To sidestep this, just take a moment to assess your situation. If you're relying on Wi-Fi, try to get as close to the router as you can. If you're using mobile data, check that you have a strong signal with 4G or 5G coverage. A weaker 3G signal can often struggle to maintain a quality voice connection.
Before making an important call, I always run a quick internet speed test on my phone. I’m not looking for a massive number, just a stable "ping" (latency) time. A low ping means a more responsive, real-time conversation without that awkward delay where you end up talking over each other.
Strategic Timing and Troubleshooting
Sometimes, the issue isn't your device but the network itself. Network congestion is a real thing, especially during peak hours when everyone in the area is online, streaming movies, and gaming.
- Consider Time Zones: Calling a business in London during their 9-to-5 might mean you're competing with peak evening internet traffic in your own location. If possible, try calling during off-peak hours for your local network.
- Toggle Your Connection: If your Wi-Fi call is struggling, don't be afraid to switch it off and let your phone use its mobile data instead. Oftentimes, a stable 4G connection is far superior to a crowded public Wi-Fi network in a café or hotel lobby.
Even with the best preparation, you might still hit a snag. When a call starts to go south, a few simple troubleshooting steps can make all the difference and often resolve the problem in seconds.
Quick Fixes for Poor Call Quality
If you find your call quality suddenly dipping, don't just suffer through it. Try these quick actions:
- Restart Your Device: It’s the oldest trick in the IT book for a reason. A quick reboot can clear up temporary glitches in your phone's software or its connection to the network.
- Move to a Better Spot: If you're on mobile data, simply moving to a different room or standing near a window can dramatically improve your signal strength.
- Close Background Apps: Apps running in the background can eat up your bandwidth. Closing them frees up those resources for your call, ensuring it gets the priority it needs for clear audio.
Avoiding Hidden Fees on International Calls

Making a call home from overseas should be simple, but hidden charges can quickly turn a quick chat into a costly mistake. The first step to protecting your wallet is understanding the different ways you can be charged. Getting a handle on this now will save you from that dreaded bill shock when you get back.
Your traditional mobile provider often relies on complex pay-per-minute rates that can be painfully high. In contrast, modern options like international eSIMs or even VoIP (Voice over Internet Protocol) services usually offer prepaid bundles, putting you in complete control of what you spend.
Uncovering Common Surprise Charges
Beyond the advertised per-minute rate, a whole host of sneaky fees can inflate your bill. Knowing what to look for is the key to figuring out how to make international calls without blowing your budget.
Keep an eye out for these potential costs:
- Connection Fees: Some companies charge a flat fee just for connecting the call, even if you only talk for a few seconds.
- Rounding Up Minutes: That call you made that was one minute and five seconds long? It might be billed as a full two minutes.
- Unexpected Roaming Costs: This is the big one. Just answering a call on your regular Aussie number while overseas can trigger eye-watering roaming charges from your provider back home. We've got a detailed breakdown in our comparison of SimCorner vs. Telstra roaming fees.
The internet has opened up so many better ways to stay in touch. With over 90% of Australian households having internet access by 2023, alternatives to old-school calling have boomed. Yet, a surprising number of people—around 35-40% of the estimated 50 million international calls made from Australia each year—still use traditional phone networks, sticking with these older, more expensive methods.
The biggest financial trap for travellers isn’t always the cost of their own calls. It’s the nasty roaming charges they get hit with when they answer a call on their home SIM. Do yourself a favour and always check your primary provider’s international roaming policy before you fly.
A Clear Cost Comparison
To show you what a difference the right choice can make, let’s look at the real-world costs. Here's a quick comparison of what you might pay for a 30-minute call to a popular spot like the USA using different methods.
Cost Comparison International Calling Methods (Per 30 Minutes)
The table below gives you an idea of the estimated cost for a 30-minute call to the USA, showing just how much your choice matters.
| Calling Method | Estimated Cost (AUD) | Key Considerations |
|---|---|---|
| Standard Mobile Roaming | $30 - $60+ | Super convenient, but almost always the most expensive option. High per-minute rates add up fast. |
| International eSIM/SIM | $5 - $15 | Fantastic value, usually part of a prepaid bundle with data. Just need an unlocked phone. |
| VoIP Service (e.g., Skype) | $1 - $3 | Dirt cheap for calling landlines and mobiles, but the call quality lives and dies by your internet connection. |
As you can see, a little planning goes a very long way. By choosing a prepaid eSIM or a VoIP service, you can have the exact same conversation for a tiny fraction of the cost. That's what we call financial peace of mind while you travel.
A Few Common Questions We Get About Calling Overseas
To wrap things up, here are some quick and clear answers to the most common questions people have when figuring out how to make international calls from Australia. It's always good to have this info in your back pocket before you head off.
Can I Still Receive Calls on My Aussie Number with an eSIM?
Yes, you absolutely can. Most modern smartphones have dual-SIM capability, which is a fantastic feature that lets you keep your Australian SIM active for incoming calls while using your new international eSIM for data and outgoing calls. It’s the best way to stay connected to everything back home.
You can set this up in your phone's settings, usually by telling your phone to use the eSIM as the primary line for mobile data and your home SIM for voice. Just be mindful that answering calls on your Aussie number might trigger roaming charges from your carrier. It’s always a good idea to check with them first so there are no surprises.
What’s the Difference Between a Country Code and an Area Code?
It’s easy to mix these two up, but they do very different jobs. A country code is a short prefix, usually 1 to 3 digits, that routes your call to a specific country—for example, +44 for the UK. You'll dial this right after Australia’s exit code (0011).
An area code, sometimes called a city code, narrows the call down to a specific region within that country. For instance, 20 is the code for London. You dial this part after the country code.
Here's a tip that catches so many people out: always drop the leading zero from the area code when you're dialling from abroad. If you see a local number written as (020) 1234 5678, you only need to dial the '20' bit after the country code.
Is Wi-Fi Calling Cheaper Than an International SIM?
This really comes down to a classic trade-off: cost versus reliability. Wi-Fi calling can be incredibly cheap—sometimes even free—but your call quality is completely at the mercy of the Wi-Fi signal you're using. It's perfect when you're in a hotel or cafe with a rock-solid connection.
An international SIM, on the other hand, hooks into local cellular networks. This gives you a much more reliable and consistent connection, especially when you're out exploring or on the move. For most travellers who need dependable service wherever they go, an eSIM is often the smarter and more practical choice for consistent, clear calls.
Ready to make your international calls simple and affordable? SimCorner offers a huge range of prepaid travel eSIMs and SIM cards for over 200 destinations, so you can stay connected without the bill shock. Find the perfect plan for your next adventure at SimCorner.


